The cabinets in a 1959 Shasta Airflyte are fabulous in the way mid century modern styling was fabulous. The edges are curved. There are scallops on the wall to wall shelf in the back that holds the canvas bunks. The cut outs for the wall to wall front cabinet are a swirly exercise in over the top beauty. We are saving everything we can. If there is a little discolored wood on the corners or edges from past water damage, so be it. We love the character. We don't want this trailer to look brand new, we want her to look loved.
The only cabinet that was not at all salvageable was the floor to ceiling closet. The pin hole in the roof just created too much soft and rotted (could go through it with a pencil) wood. We are completely rebuilding that cabinet from birch and poplar.
So, let's take a tour of Connie's cabinets pre-disassembly in our 1959 Shasta Airflyte and see where we are today...
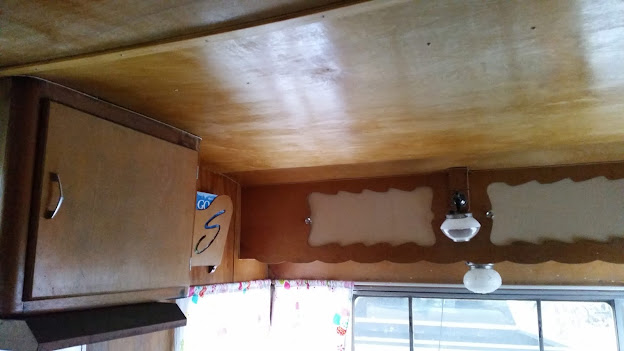 |
Front cabinets. So much to love: the gas lamp, the chevron handles, the curves, the "S" magazine rack, the cutouts on the sliding cabinet. This is the first area you see when you step into an Airflyte. No wonder we were smitten. |
 |
Front dinette curb side. There is a drawer that slides in and is a great place to find a dead mouse. Not that we would know. I would like to re-imagine the storage space here. The drawer is in a clumsy place to pull out all the way.
|
 |
These are the upper kitchen cabinets. You can see some water damage (from the leaky vent) on the lower right of the stove cabinet. It is looking way better in the restoration but I don't want to lose all that character. Love those curves.
|
 |
Lower kitchen cabinets. All the doors are original but the door faces are slightly different color than drawer faces (different wood?). The birch ply on either side of the stove will need to be replaced but the rest is in decent share to restore. Love the slide out cutting board. I will make a new board. It was originally coarse plywood. A bit $#@& really.
|
 |
This is a picture the street side between the kitchen and the gaucho. Under the window, at the end of the gaucho is a storage cabinet (you can see the knob on top of the part that lifts up. I loved that cabinet, I put my glasses and kindle in there at night. It would be a good place to possibly put a charging station.
|
 |
The back of the trailer. I love the scalloped shelf that holds the canvas bunks and poles. Good picture of the 70s plywood that fooled no one. It was placed right over the completely delaminated birch ply that was 100 colors of rot. We will rebuild the gaucho bed. I know a lot of folks like to have the bed full time but I love the having the option of a sofa area. Especially during winter camping. You can also see the drawer under the gaucho. The door was always flipping down. I am thinking I would love a cedar lined drawer here for bedding.
|
 |
Here is the big one, the floor to ceiling cabinet. The structural work horse of a canned ham. It looks ok in this picture but EVERY corner was rotted, soft wood that you could crumble in your fingers. We are currently deep in the debate of ice box vs refrigerator. This is also likely the space that we will put an air conditioner. I would like to use the left side for a stand up portable style AC. I just love that mirror, it gives the illusion of more space.
|
 |
Refinishing the magazine rack. The nails are 7/8 inch nickel plated twisty nails. They are everywhere. I love the rounded silver heads. That "S" is just so iconic.
|
 |
Shellac restoral tip: paint scraper does wonders to remove about 90% of old shellac without removing any wood. Saves so much time and makes it less likely you will go through the plywood veneer.
|
 |
I can't tell if the picture is out of focus or we are standing in a dust storm of our own making. We started the sanding process last winter in our basement (Wisconsin winters, needs must.)
|
 |
And here is Kirk just a couple days ago applying one of what will be 6 layers of shellac (4 amber, 2 clear). Our front bedroom is now a shellacking studio. (Wisconsin summers, needs must) |


So happy you are blogging! I love seeing Connie’s beautification step-by-step.
ReplyDeleteThank you! We are really enjoying ourselves, even if there is a steep learning curve :)
ReplyDelete